Heat Transfer Size Placement Guide
When it comes to applying heat transfers to garments, placement and sizing are crucial to achieving a professional look. Whether you’re working with t-shirts, hoodies, or other apparel, knowing where and how to position your designs can make all the difference. In this guide, we’ll cover the optimal placement for heat transfers on various garments to help you create polished, well-aligned prints every time.
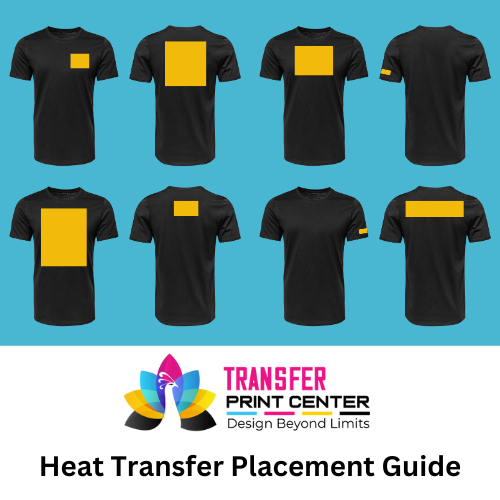
T-Shirts
Front Design Placement:
- Full Front Design: For a standard full front design on adult t-shirts, place the top of the design 2-3 inches below the neckline. The center of the design should be aligned with the center of the shirt.
- Left Chest Design: For smaller logos or text on the left chest, position the design approximately 3.5-4 inches from the neckline and 2-3 inches from the center seam.
- Youth T-Shirts: Adjust the placement slightly higher, with the top of the design 1.5-2 inches below the neckline.
Back Design Placement:
- Full Back Design: Position the top of the design 3-4 inches below the neckline for adult t-shirts. Ensure the design is centered horizontally.
- Upper Back Design: For smaller designs on the upper back, place the top of the design 1-2 inches below the neckline.
Sleeve Design Placement:
- Short Sleeve: Place the design 1 inch above the hem of the sleeve, centered horizontally.
- Long Sleeve: Position the design 1-2 inches above the cuff, centered horizontally.
Hoodies and Sweatshirts
Front Design Placement:
- Full Front Design: For adult hoodies, place the top of the design 3-4 inches below the neckline to accommodate the hood. Center the design horizontally.
- Left Chest Design: Position the design 3-3.5 inches from the neckline and 2-2.5 inches from the center seam.
Back Design Placement:
- Full Back Design: Place the top of the design 4-5 inches below the neckline to ensure it is visible below the hood when worn. Center the design horizontally.
Sleeve Design Placement:
- Upper Sleeve: Position the design 1-2 inches from the shoulder seam, centered vertically.
- Lower Sleeve: Place the design 1-2 inches above the cuff, centered vertically.
Polo Shirts
Front Design Placement:
- Left Chest Design: For the classic left chest logo on polo shirts, position the design 7-9 inches from the left shoulder seam and 4-6 inches from the neckline. Adjust for larger or smaller designs as needed.
Tank Tops
Front Design Placement:
- Full Front Design: Place the top of the design 2-3 inches below the neckline. Be mindful of the armholes to ensure the design remains centered and visible.
Back Design Placement:
- Full Back Design: Position the top of the design 3-4 inches below the neckline, centered horizontally.
Onesies and Baby Clothes
Front Design Placement:
- Full Front Design: For baby onesies, position the top of the design 1-1.5 inches below the neckline. Center the design horizontally.
- Small Front Design: For smaller designs, place the top of the design 0.5-1 inch below the neckline.
Hats and Caps
Front Design Placement:
- Front Center Design: Place the design 0.5-1 inch above the bill, centered horizontally.
- Side Design: Position the design 0.5-1 inch above the brim, centered vertically on the side panel.
General Tips for Optimal Placement
- Measure Twice, Press Once: Always double-check your measurements before pressing to ensure accurate placement.
- Use Alignment Tools: Consider using rulers, T-squares, or alignment grids to help position your designs accurately.
- Consider the Garment Size: Adjust placement based on the size of the garment. Smaller sizes require higher placement, while larger sizes may need the design to be positioned slightly lower.
- Pre-Press the Garment: Pre-pressing the garment helps remove moisture and wrinkles, providing a smooth surface for applying the transfer.
- Test with a Sample: If possible, test the placement on a sample garment to ensure it looks right before applying to the final piece.
Conclusion
Proper placement of heat transfers is key to achieving a professional and polished look. By following these guidelines and taking the time to measure and align your designs accurately, you can create high-quality custom apparel that stands out. Whether you’re working on t-shirts, hoodies, or other garments, the right placement will ensure your designs look great and are positioned perfectly every time.
By Transfer Print center
in July 10,2024